You're reading the documentation of the v0.7. For the latest released version, please have a look at v1.2.
Usage
Installation
To use perceval, you can directly install the pip wheel in a virtual environment:
(.venv) $ pip install perceval-quandela
Alternatively, if you are interested in contributing to the project - you can clone the project from github:
(.venv) $ git clone https://github.com/quandela/Perceval
(.venv) $ cd Perceval
(.venv) $ python setup.py install # or develop for developers
At this point you can directly use Perceval. For following the tutorial below, we do recommend running it in a jupyter notebook, or in the Python console of your favorite IDE (Spyder, Pycharm) but you can also run it in a terminal python console.
First Circuit
Import the library and the components from the unitary components library:
>>> import perceval as pcvl
>>> import perceval.components.unitary_components as comp
Defines a circuit as a simple beam-splitter, it is a 2-mode circuit
>>> c = comp.BS()
>>> c.m
2
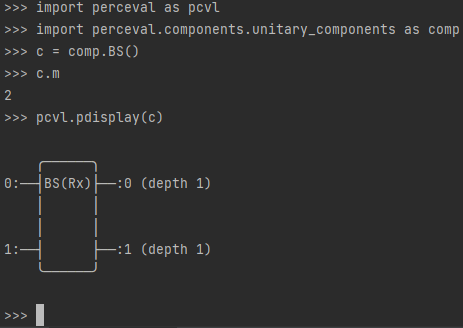
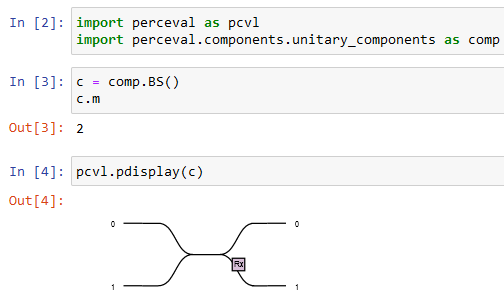
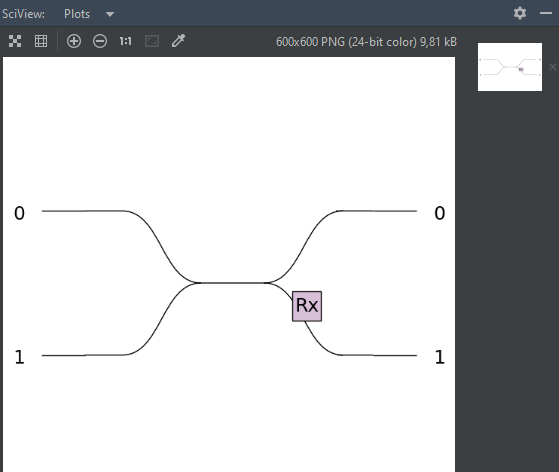
>>> pcvl.pdisplay(c)
Tip
The outcome of this last command will depend on your environment - see Visualization.
Text Console |
Jupyter Notebook |
Within IDE (Pycharm, Spyder) |
|---|---|---|
|
|
|
Check the definition of the circuit, and the values of these parameters:
>>> pcvl.pdisplay(c.definition())
⎡exp(I*(phi_tl + phi_tr))*cos(theta/2)    I*exp(I*(phi_bl + phi_tr))*sin(theta/2)⎤
⎣I*exp(I*(phi_br + phi_tl))*sin(theta/2)  exp(I*(phi_bl + phi_br))*cos(theta/2)  ⎦
>>> c.get_parameters(all_params=True)
[Parameter(name='theta', value=pi/2, min_v=0.0, max_v=12.566370614359172), Parameter(name='phi_tl', value=0, min_v=0.0, max_v=6.283185307179586), Parameter(name='phi_bl', value=0, min_v=0.0, max_v=6.283185307179586), Parameter(name='phi_tr', value=0, min_v=0.0, max_v=6.283185307179586), Parameter(name='phi_br', value=0, min_v=0.0, max_v=6.283185307179586)]
Display the unitary matrix for these fixed parameters, and check it is unitary:
>>> pcvl.pdisplay(c.U)
⎡sqrt(2)/2    sqrt(2)*I/2⎤
⎣sqrt(2)*I/2  sqrt(2)/2  ⎦
>>> c.U.is_unitary()
True
Let us decide to send one photon on the lower left branch of the beam splitter. It is corresponding to the following input state:
>>> input_state = pcvl.BasicState("|0,1>")
>>> input_state.n
1
Define a simulator for the circuit:
>>> backend = pcvl.BackendFactory().get_backend()
>>> simulator = backend(c)
Get the output state of the circuit for this input_state:
>>> print(simulator.evolve(input_state))
sqrt(2)*I/2*|1,0>+sqrt(2)/2*|0,1>
Sample some output states:
>>> p = pcvl.Processor("Naive", c)
>>> p.with_input(input_state)
>>> sampler = pcvl.algorithm.Sampler(p)
>>> samples = sampler.samples(10)
>>> for state in samples['results']:
...    print(state)
...
|0,1>
|0,1>
|0,1>
|1,0>
|1,0>
|0,1>
|0,1>
|0,1>
|0,1>
|0,1>
Get the actual probability associated to each output state:
>>> probs = sampler.probs()
>>> pcvl.pdisplay(probs['results'])
+-------+-------------+
| state | probability |
+-------+-------------+
| |1,0> |     1/2     |
| |0,1> |     1/2     |
+-------+-------------+
Get the full probability distribution for multiple input states:
>>> ca = pcvl.algorithm.Analyzer(p,
...                           [pcvl.BasicState([0, 1]), pcvl.BasicState([1, 0]), pcvl.BasicState([1, 1])], # the input states
...                           "*" # all possible output states that can be generated with 1 or 2 photons
...                          )
>>> pcvl.pdisplay(ca)
+-------+-------+-------+-------+-------+-------+
|       | |1,0> | |0,1> | |2,0> | |1,1> | |0,2> |
+-------+-------+-------+-------+-------+-------+
| |0,1> |  1/2  |  1/2  |   0   |   0   |   0   |
| |1,0> |  1/2  |  1/2  |   0   |   0   |   0   |
| |1,1> |   0   |   0   |  1/2  |   0   |  1/2  |
+-------+-------+-------+-------+-------+-------+
Congratulations, you have achieved this first tutorial! You can now continue with the documentation through Circuits, Computing Backends, States, Polarization or you will go through more advanced examples in the Examples section starting with Getting started with Perceval.